Intelligent Flows in Kernaro
Overview
Intelligent Flows in Kernaro are agentic workflows that allow users to automate multi-step reasoning, data transformation, and system integration processes.
These flows connect multiple components, ranging from data inputs and LLM-based processing to EA tool interactions and output generation within a single, guided execution path.
Each flow consists of a sequence of nodes, where each node performs a specific task such as reading input data, running a prompt through an LLM, executing Python code, or interacting with EA GraphLink.
Types of Nodes
Batch LLM Node
Executes LLM prompts in bulk over multiple rows or records.
Suitable for large datasets where similar prompts need to be applied iteratively.
EA GraphLink
Enable interaction with your EA Repository via GraphLink APIs.
You can query, create, or update EA elements using GraphQL queries or templates as part of your automated flow.
Excel Download
The Excel Download Node allows you to export data from any previous node in the flow as an Excel file.
Excel Upload
Allows users to upload Excel files containing structured input data.
The uploaded data can be referenced and processed by subsequent nodes in the workflow.
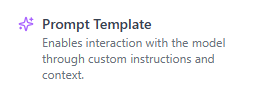
Prompt Template
Let’s define reusable LLM prompts that can process dynamic inputs.
Ideal for data enrichment, summarization, or intelligent text transformation.
Python Interpreter
Allows you to run custom Python scripts directly within the flow.
Useful for advanced data transformations, validations, or integration logic.
Key Highlights
- Low-code, visual interface for building agentic workflows.
- Combine LLM reasoning with structured EA data.
- Integrate seamlessly with EA GraphLink for repository actions.
- Supports both custom logic (Python) and model-driven reasoning.
Configuring and Using Nodes
Batch LLM
Purpose
The Batch LLM Node is used when you want to perform prompt-based tasks in bulk.
It automatically creates multiple parallel jobs based on the defined input mappings and generates a unique prompt for each record or row of data.
- This node is ideal for scenarios where the same instruction or reasoning pattern needs to be applied across multiple data entries, such as enriching Excel data, generating summaries, or categorizing information at scale.
- The Batch LLM Node uses the default Batch LLM configured in your Kernaro Chat environment to generate responses.
- If no Batch LLM is configured, the node will be disabled during flow creation, and you will not be able to use it until the configuration is completed.
Configuration
Prompting And Mapping
- You can provide System Instructions and User Instructions separately in the designated prompt text areas.
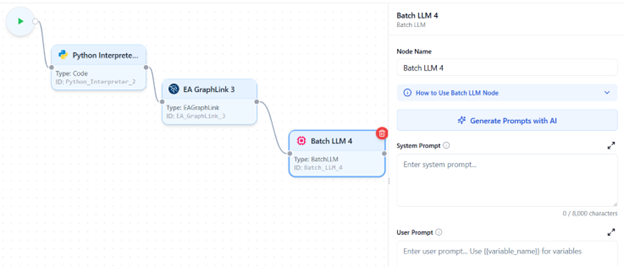
- In the User Prompt, variables can be mapped using the {{}} syntax. Once variables are defined below the text area, the Mappings List displays the added variables.
- Use the Fetch Fields button to retrieve available values from previous nodes for easy variable mapping.
- Enable Loop if the mapped variable is a list; this will generate prompts dynamically based on each list item.
- If multiple variables are mapped in a loop, the system automatically builds all possible prompt combinations.
Batch Identifier
Each batch can be identified using the Batch Identifier setting, which can be set to Automatic or Manual.
- Automatic – Generates a random GUID for each batch automatically.
- Manual – Allows you to define a custom batch ID based on a specific column or field.
When To Use a Manual?
Use Manual Batch ID when you are generating combinations of prompts and need to trace which result corresponds to which specific prompt, ensuring clear mapping between generated outputs and their source variables.
Do’s and Don’ts
- Clicking Fetch Fields executes the upstream nodes to retrieve column values.
- If those nodes include Code Nodes with database or API operations, those actions will be executed during the fetch.
- If a Prompt Node is connected upstream, fetching or running the flow may trigger it and consume LLM tokens immediately.
- Batch execution time depends on the number of prompts, prompt complexity, and model throughput. Large batches can take several hours to complete.
- Token usage increases proportionally when looping over multiple variables or generating combinations. Use caution, as large combinations may increase cost and processing time.
Best practices (recommended):
- Test with a small sample before running the full batch.
- Preview mappings to confirm accuracy and avoid triggering expensive API or database operations unintentionally.
- If any Code Nodes shouldn’t run during fetch, disable or isolate them before fetching fields.
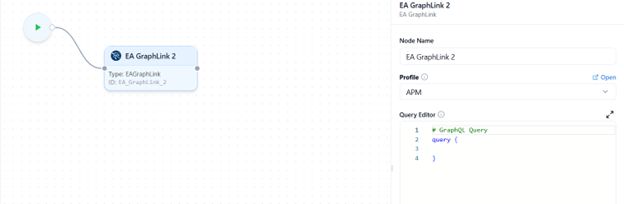
EA Graphlink Tool
Purpose
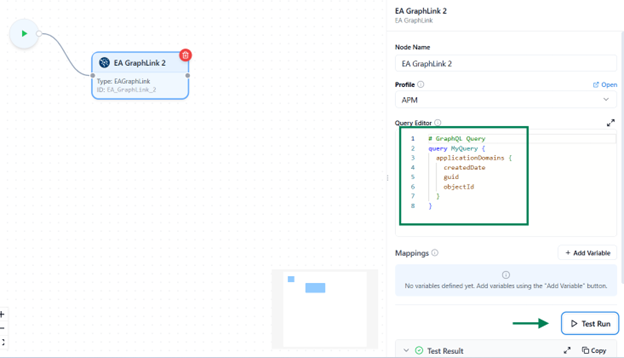
The EA GraphLink Node is used to fetch, query, or interact with data from your connected EA GraphLink models using GraphQL queries.
- It enables your Intelligent Flow to communicate directly with the EA repository, allowing you to read architectural data as part of automated workflows.
This node bridges your Kernaro environment with the underlying EA GraphLink service, making it possible to perform tasks such as retrieving element details, or linking model information within the same flow.

Configuration
Building Your Query
- Select a GraphLink Profile
- A dropdown lists all configured GraphLink profiles connected to your environment.
- Select the profile you want this node to use for executing queries.
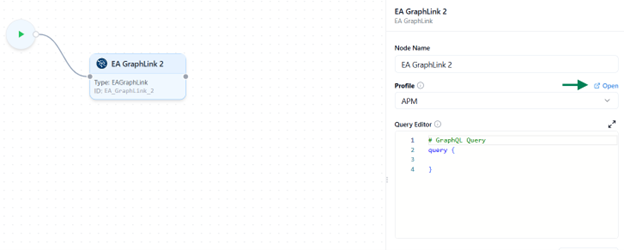
- Open the GraphLink Editor
- Once a profile is selected, an Open icon appears beside the query editor.
- Click this icon to launch the GraphLink Editor, where you can:
- Visually build and test your GraphQL query.
- Run the query to preview results in real time.
- Copy the generated query and paste it into the editor for further modification.
- Manual Query Entry
- If you prefer, you can manually type or paste a valid GraphQL query directly into the editor area.
- The system supports both read (query) and write (mutation) operations, depending on your GraphLink configuration.
Test Your Query
Before running the full flow, use the Test Run feature to validate this node independently.
- Run Current Node Only
- Executes only this GraphLink node for quick verification.
- If your query includes mapped variables, you’ll be prompted to provide sample data for testing.
Testing helps ensure your query returns to the expected results, and that variable mappings are correct before executing the entire flow.
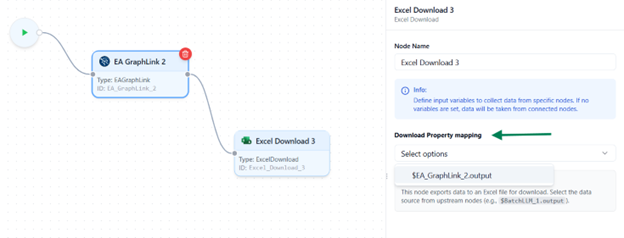
Excel Download Node
Purpose
The Excel Download Node allows you to export data from any previous node in the flow as an Excel file.
- It is typically used at the end of an Intelligent Flow to save, review, or share the processed results.

Configuration
Select Source Node
- In the right-hand sidebar, you’ll see a dropdown list displaying all previously connected nodes in the flow.
- Choose the node whose output data you want to export as an Excel file.
Run and Export
- When the flow executes successfully, the system generates a downloadable Excel file containing the selected node’s data.
- You can then download, save, or share the exported file as needed.
Do’s and Dont’s
- Ensure that the selected node produces structured data (such as tables, lists, or dictionaries) for accurate export results.
- Use this node as the final step in your flow when you need to save or share processed outputs.
- Do not connect additional nodes after the Excel Download Node,it represents the final output stage of your flow.
- Avoid adding multiple Excel Download Nodes in the same flow; only one is allowed per Intelligent Flow.
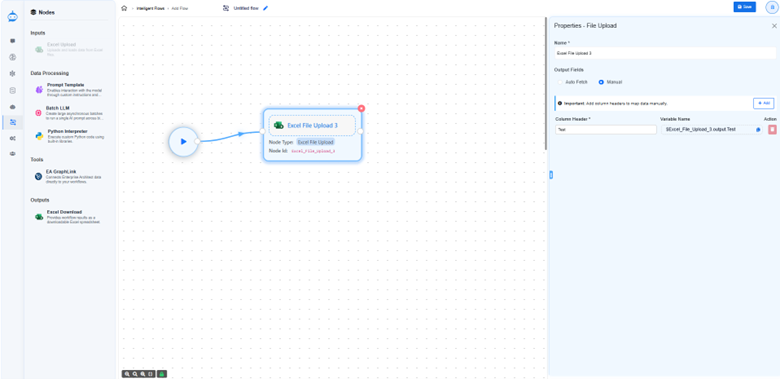
Excel Upload Node
Purpose
The Excel Upload Node is used to import structured data from an Excel file into an Intelligent Flow.
It serves as the starting point of the workflow, allowing users to provide tabular input data
that can be referenced and processed by subsequent nodes such as Prompt Templates, LLMs, or Python scripts.
This node is ideal for scenarios where you need to enrich, transform, or analyze large datasets directly within Kernaro.
Note: Each Intelligent Flow can contain only one Input Node, and it must be configured before adding any processing or output nodes.
Configuration
Add the Node
- Navigate to the sidebar and drag and drop the “Excel Upload” node onto the Flow Designer canvas.
- This node serves as the starting point of your Intelligent Flow.
Upload the File
- Click Upload Excel File and select a file from your system.
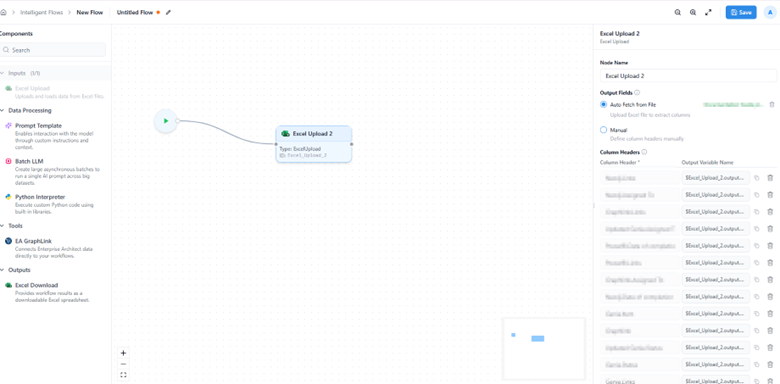
- Once uploaded, the system automatically extracts the column headers and displays them in the right sidebar.
- These headers are essential because they define the input data structure and are later used for mapping variables across other nodes.
Column Mapping
In the right sidebar, you can define or manage column headers using two modes:
- Auto Fetch
Upload an Excel file, and the system will instantly fetch and list all column headers detected in the sheet.
- Manual
Use this option if you don’t yet have an Excel file ready.
You can manually type the column headers (for example: Name, Author, Description).
Header Referencing and Variable Mapping
- Each column header is automatically assigned a unique reference value in the format: <NodeID>.output.<ColumnName>
Example:
Excel_1.output.Name
- Here, Excel_1 represents the Node ID of your Excel Upload node.
- This structure ensures that column names remain unique when multiple Excel nodes are used in different flows.
- These references can be copied directly for manual mapping, although most nodes will automatically display them in dropdowns for easier selection.
Do’s and Don’ts
- Only .xlsx or .xls file formats are supported.
- Files that are CSV, password-protected, or corrupted are not supported and may fail to upload.
- Ensure your workbook contains at least one valid, non-empty sheet.
- Make sure your Excel file has clear headers in the first row (e.g., Name, Author).
- Avoid using special characters or spaces in header names.
- Recommended: Application_Name
- Not Recommended: Application Name
- Avoid duplicate column names to help with smoother data mapping.
- The system processes all available data within the workbook. Please review the content before uploading.
- You can always manually add headers if your file doesn’t have any.
Prompt Node
Purpose
- The Prompt Node is designed to process text-based instructions or prompts using the system’s configured Reasoning Model (LLM). It enables users to define custom instructions that the LLM interprets to generate meaningful responses or transformations within a flow.
- This node uses the default Reasoning LLM configured in your Kernaro Chat environment. If no Reasoning LLM is configured, the Prompt Node will be disabled during flow creation, and you will not be able to use it until the configuration is completed.
Configuration
Entering a Prompt
You can define your prompt in one of two ways:
- Static Prompt – Enter plain text instructions that the LLM will process as-is.
- Dynamic Prompt – Include variables from other nodes to make the prompt context-aware.
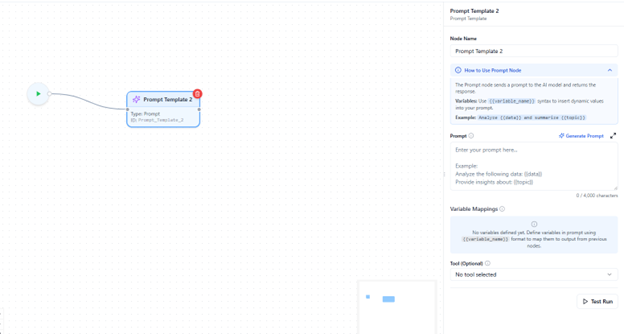
- To include a dynamic variable, enclose it within double curly braces {{}} (for example, {{VariableName}}).
- Any text inside {{}} is treated as a variable and will dynamically pull data from connected nodes.
Variable Mapping Block
When you include variables in the prompt, a Variable Mapping Block automatically appears below the text editor.
This block lists all identified variables, each paired with a dropdown menu showing available outputs from previously connected nodes.
- Select which node’s output should be used for each variable.
- To remove a variable, simply delete it from the prompt text, it will automatically disappear from the mapping block.
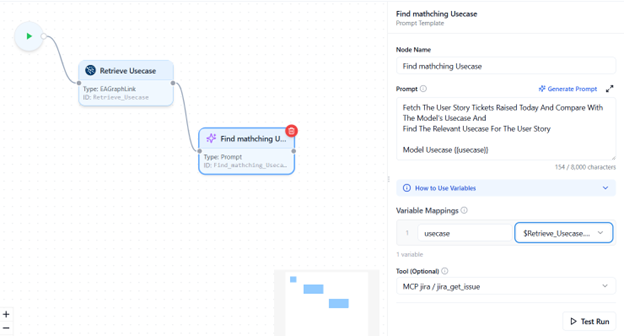
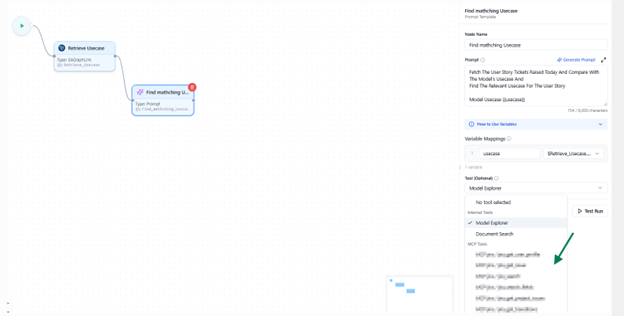
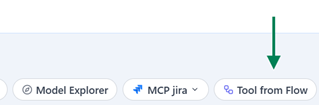
Tool Selection
The Select Tool dropdown allows you to attach an external tool or an existing flow as part of your prompt processing.
- If MCP tools are configured in your environment, they will appear in this list.
- You can also reuse another flow as a tool, provided it’s enabled for tool usage in the flow listing view.
This enables chaining of prompts with external reasoning tools or reusable sub flows.
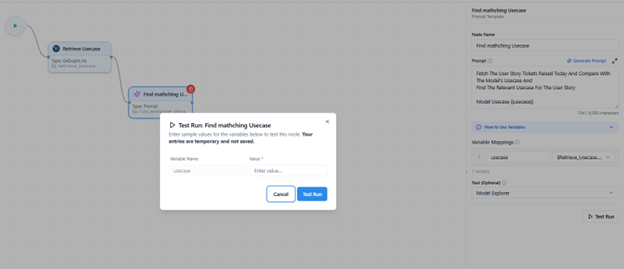
Testing Your Prompt
Before running the full flow, use the Test Run feature to validate your prompt logic.
- Run Current Node Only
- Executes just this prompt node for quick validation.
- If mapped variables are used, you’ll be prompted to provide sample data for testing.
This helps verify your prompt output and variable mapping without executing the entire flow.
Do’s and Don’ts
- The Reasoning LLM Configuration is mandatory to enable and use this node.
- Each test run consumes tokens from your configured LLM. Use this feature thoughtfully.
- Avoid unnecessary repeated test runs to manage usage efficiently.
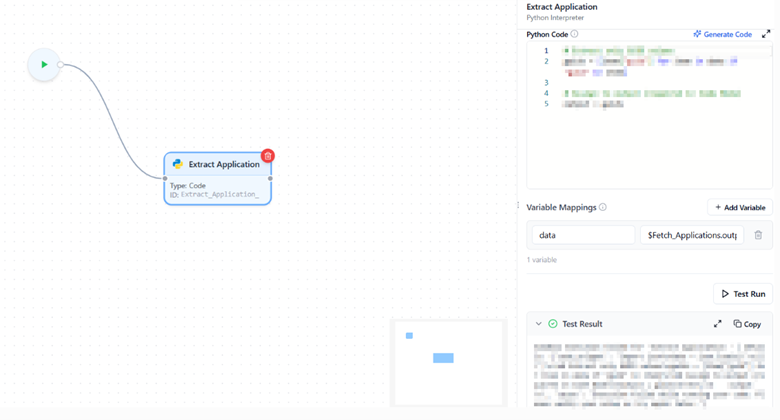
Python interpreter
Purpose
- The Code Node allows you to write and execute Python code directly within an Intelligent Flow.
- It is primarily used for performing custom data processing, transformations, API requests, or any other logic that cannot be achieved through standard nodes.
- This node operates entirely within the Docker environment.
An Intelligent Flow containing a Code Node will function only if Docker is installed and running on the host system.
- For installing Docker with Windows containers, please refer to the installation guide provided in this document. Docker Setup
Configuration
Writing Code
- Type or paste your Python code into the code editor area.
- Always assign the final result of your logic to a variable named output.
- This is mandatory, as Kernaro recognizes only the output variable as the node’s result.
- The output variable is automatically passed to the next connected node.

Generate Code via Prompt
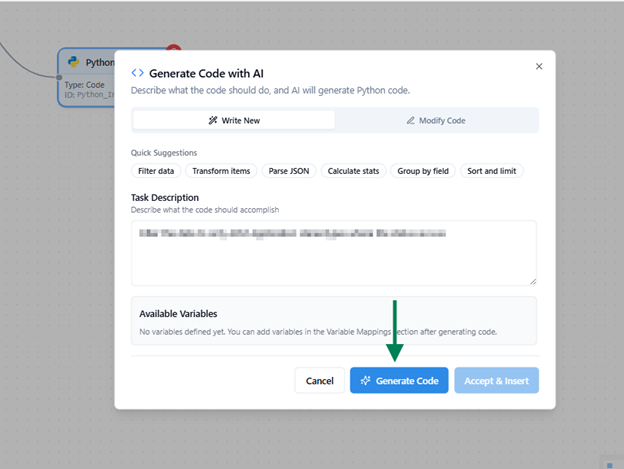
Upon clicking the “Generate Code” option at the top right of the Python Code section, the user can generate code with the help of a prompt.
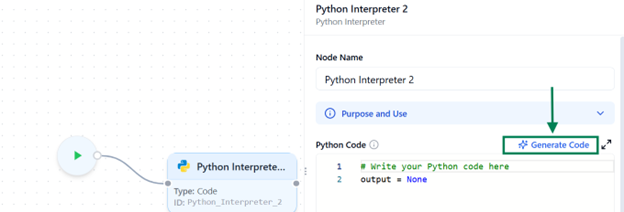
Generate Code With AI
After the Task Description is given Click Generate Code
The generated code will be displayed as shown in the image below. After reviewing it, you can insert it by clicking the ‘Accept & Insert’ button.
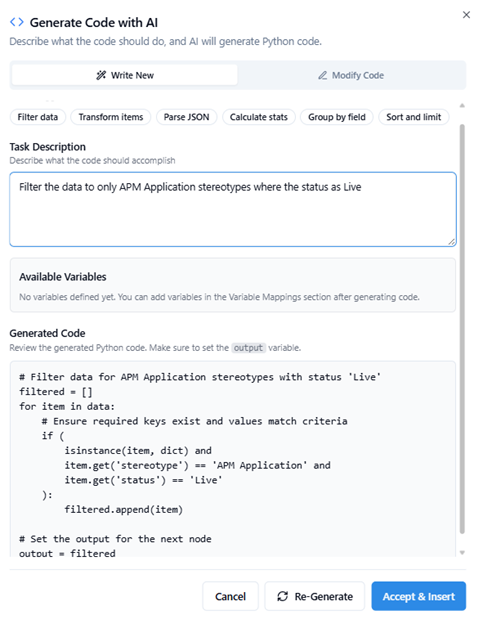
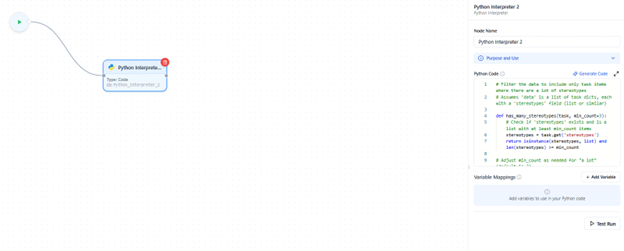
We can see the generated code added on the right side for the task.
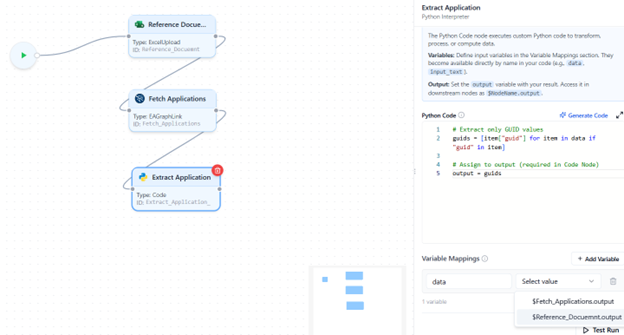
Adding Variables
- Below the code editor, you can add required variables manually.
- These variables represent the dynamic data your code will use (for example, data from Excel columns or other nodes).
- Reserved Keywords
The following names cannot be used as variable identifiers since they are either Python keywords or system-reserved: False, None, True, and, as, assert, async, await, break, class, continue, def, del, elif, else, except, finally, for, from, global, if, import, in, is, lambda, nonlocal, not, or, pass, raise, return, try, while, with, yield, output - As with other nodes, variable mapping works the same way:
- Variables from previously connected nodes will appear in the dropdown list.
- You can select which output should be passed into your code.
Testing Your Code
Before running the complete flow, use the Test Run feature to validate the code block.
- Run Current Node Only:
→ Executes just this node for quick testing.
→ If the code uses mapped variables, you’ll be prompted to enter sample data for testing.
Sandbox Configuration
All Code Nodes execute within a secure sandbox environment, controlled by the Intelligent Flow Settings.
To Modify Workflow Code Node Configurations .Insert This Schema in Database.
   INSERT INTO Kernaroschema.general_configurations (name, value)

VALUES (

    'workflow_configurations',


    '{


        "allow_net": false,


        "allow_env": false,


        "allow_run": false,


        "allow_write": false,


        "allow_read": false,


        "execution timeout": 30 ,


        "timeunit":"minutes"


    }'::jsonb


);
- These global sandbox parameters apply to all Code Nodes across all flows and can be managed under Workflow Configurations.
- The configuration options include:
| Description | |
|---|---|
| allow_net | Enables network access (e.g., API calls). |
| allow_env | Allows reading environment variables. |
| allow_run | Permits subprocess execution. |
| allow_write | Grants’ permission to write files within the sandbox environment. |
| allow_read | Grants’ permission to read files within the sandbox environment. |
| execution_timeout | Sets the maximum code execution time (in minutes/seconds). |
| timeunit | Allowed To Set “minutes” or “seconds” |
Integration with Prolaborate
- You can also integrate a flow with Prolaborate using the Code Node via API.
- To enable this integration, you need to generate a Personal Access Token (PAT), which is required to authenticate and obtain the API Authorization Key.
- For detailed steps on generating a PAT, refer to this guide.
Do’s and Dont’s
- The final output must be stored in a variable named output; otherwise, downstream nodes cannot recognize the result.
- Only variables from connected previous nodes are available for mapping.
- The sandbox configuration is shared globally and applies to all code executions.
- A test run performs a real execution.
→ If your code includes API calls or database operations that create, update, or delete data, those actions will actually occur. Always verify the logic before running.
General Workflow Guidelines and Best Practices
When designing an Intelligent Flow in Kernaro, keep the following principles in mind to ensure reliability, performance, and clarity.
- Variables from any node become available in other nodes Mappings only when a valid connection exists between them.
→ This means a node can access data only from previously connected nodes in the flow sequence.
- Each node has its type and unique ID displayed directly on the node itself
- You can modify the node name from the sidebar panel for better clarity while designing your flow.
- A node highlighted in red indicates a validation error, meaning its configuration is incomplete or missing required information.
- A red unplugged icon at the bottom-right corner of a node indicates a broken link or missing connection between nodes.
- Any flow that contains an Input Node (either Excel Upload or Text Input) cannot be added as a tool or included in the scheduler.
→ This ensures that only fully automated, self-contained flows are reusable as tools or for scheduled execution.
- Use the Test Run feature incrementally to verify configuration of correctness before running the complete flow.
- Use clear and descriptive names for variables and nodes to make the flow easier to understand and maintain.
- Always check for validation errors or connection issues before running the flow to prevent runtime failures.
- Complex nodes such as Batch LLM or Code Node may consume more processing power or tokens, test with smaller datasets first to optimize performance and cost.
- Always save your flow after major configuration changes to prevent data loss and maintain version consistency.
Managing Intelligent Flows
Overview
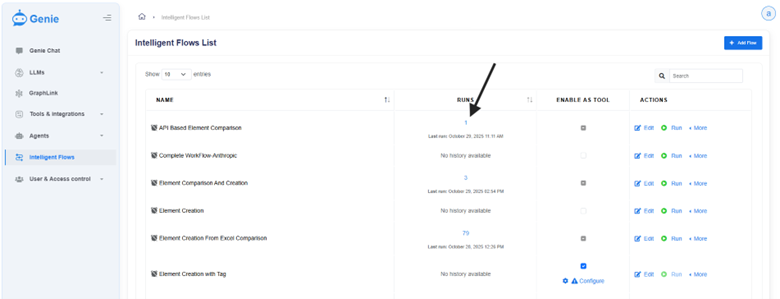
The Intelligent Flows List page provides an overview of all the flows created or defined within Kernaro. From this page, users can view, edit, execute, or manage each flow and its associated configurations.
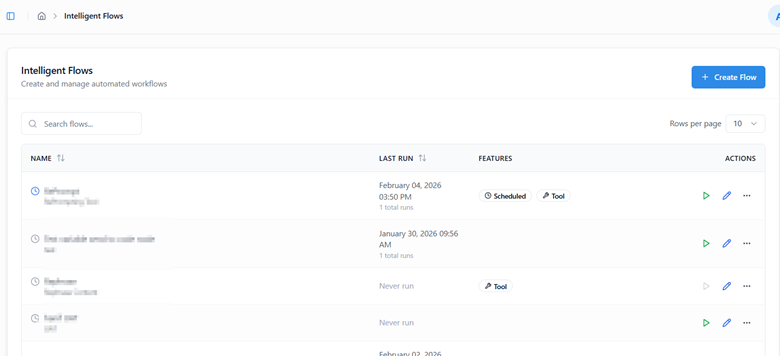
Each flow entry includes the following details:
| Name | Description |
|---|---|
| Name | Displays the name of the defined Intelligent Flow. |
| Last Run | Shows the total number of times the flow has been executed, including both manual and scheduled runs, along with the timestamp of the most recent execution. |
| Enable as Tool | Allows you to register the flow as a reusable tool. Once enabled, the flow can be used within Kernaro Chat or referenced inside a Prompt Node for automation. |
| Actions | Provides quick options to Edit, Run, or open the More Options menu for additional controls. |
| Duplicate | Create a Copy of the existing flow. |
| View History | The execution history of Manual Runs & Scheduled Runs will be tracked. |
| Delete Flow | Delete the flow permanently. |
| Edit Schedule | Schedule the flow for automatic execution. |
| Create Flow | Use the Create Flow button at the top-right corner of the page to create a new Intelligent Flow. |
Execute a Flow
The Run feature allows you to manually execute a designed flow, monitor its progress in real time, and review its output upon completion.
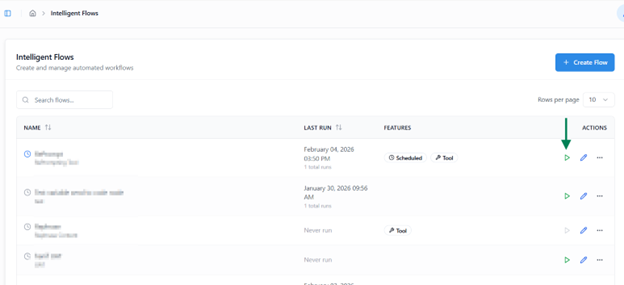
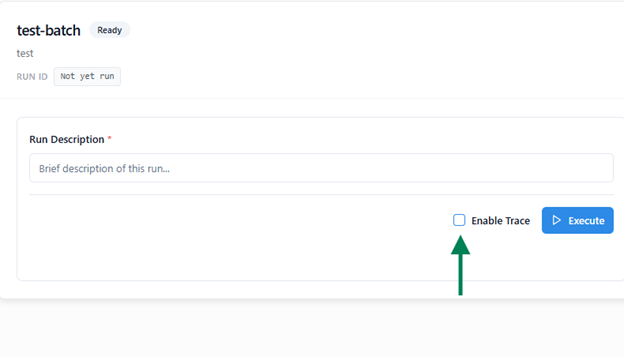
Starting an Execution
- Click the Run button to start the manual execution of a flow.
- This opens Run View, where you can monitor progress step by step.
- If the flow includes an Input Node, you will be prompted to provide the required input before execution begins.
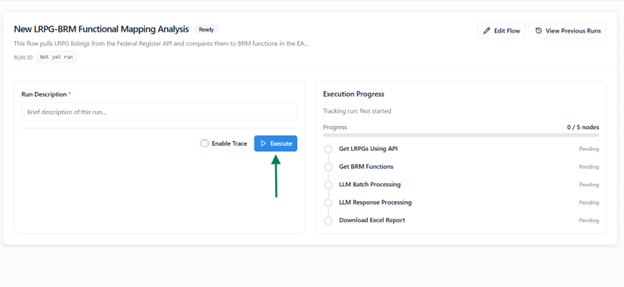
Run View Overview
The Run View provides detailed visibility into the execution process, including:
| Name | Description |
|---|---|
| Name | Displays the name of the flow being executed. |
| Run ID | A unique, auto-generated identifier for each execution, useful for tracking and referencing. |
| Description | Enter a short note or description to record the purpose of the run for future reference. |
| Job Status Panel | Displays all nodes in the flow and highlights the node currently being executed. |
| View Previous Runs | Access past execution records using the button available at the top-right corner. |
Abort Run
- You can abort the execution at any point using the Abort option.
- This immediately stops the process and marks the run as Aborted in the history.
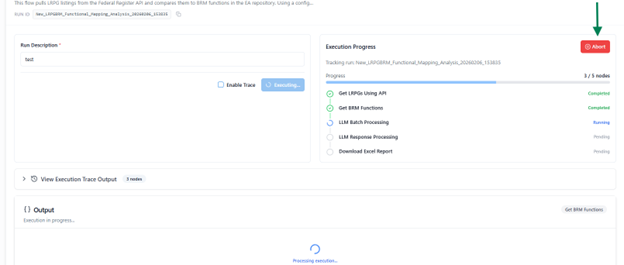
Enable Trace
Before starting an execution, you can enable the Trace option.
When enabled:
- The system records detailed execution data for each node, including inputs, outputs, and mappings.
- After completion, a Trace Log is generated in JSON format and made available for download.
- This log helps with debugging and analyzing flow behavior in case of errors.
Execution Completion and Output
- After the flow finishes, the Input and Output sections are displayed at the bottom of the Run View
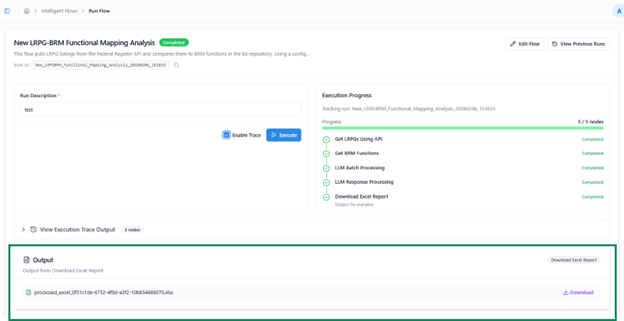
- The output may vary depending on the flow design (e.g., a file, JSON response, or string value).
- You can navigate away during execution and later return through Run History to review the run’s status, output, or trace details.
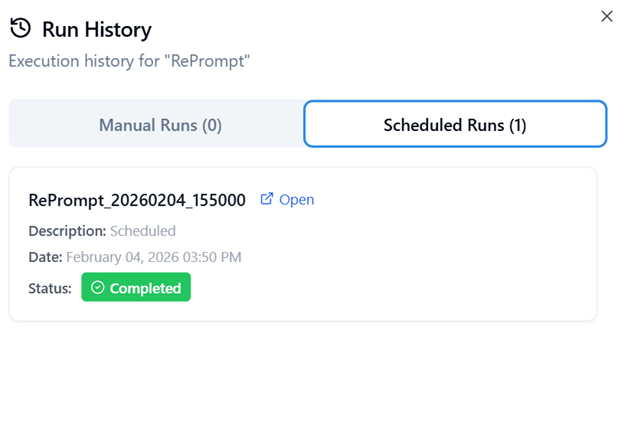
Flow Run History
Run History allows you to view detailed records of all past executions, both manual and scheduled, for each Intelligent Flow.
Accessing Run History
Upon the Last Runs column to view the Recent execution history.
Upon clicking View History from the Actions column’s more option button of the respective flow, a modal window appears
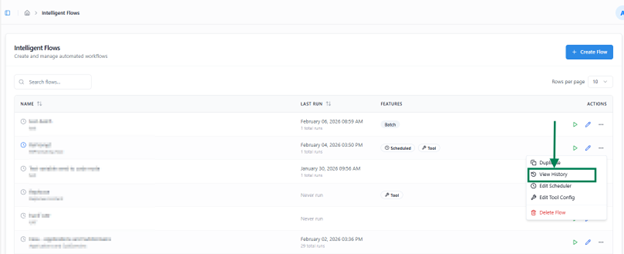
modal window appears containing two tabs:
- Manual Runs
- Scheduled Runs
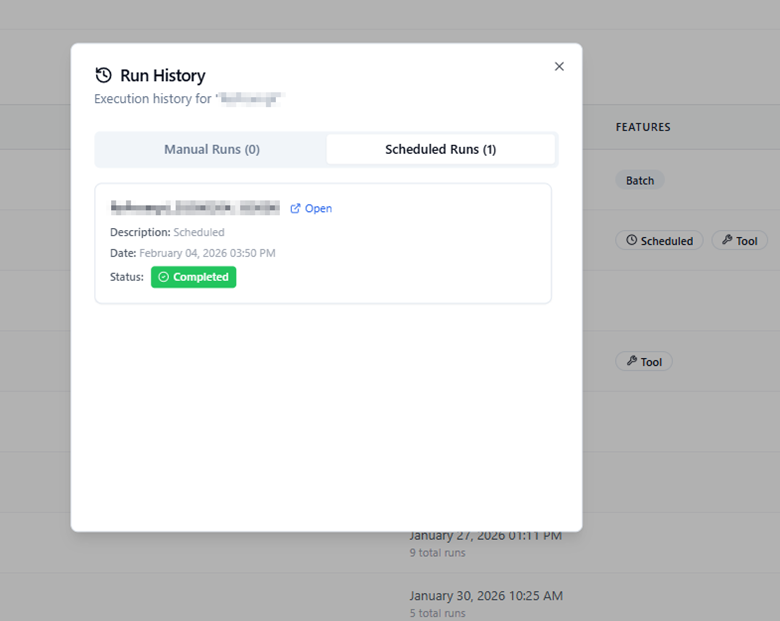
Manual Runs
The Manual Runs tab lists all executions that were manually triggered by users.
For each run, you can view:
- Run Time – Timestamp indicating when the flow was executed.
- Description – The note or purpose provided during execution.
- Status – Indicates whether the run was Completed, Aborted, or Failed.
- Open – Opens a detailed view of that run.
Scheduled Runs
The Scheduled Runs tab displays executions triggered automatically based on defined schedules.
Each record displays:
- Run Time – The time when the flows executed.
- Description / Purpose – The note provided during scheduling or execution.
- Status – Can be one of the following:
- Completed – The flow executed successfully without any issues.
- Aborted – The run was manually stopped during execution.
- Failed – An error interrupted the run (e.g., a query failure, connection issue, or node error).
The Open button allows you to:
- View the job steps executed during that run.
- Examine the run output, which may include:
- A file (if the flow generates downloadable output),
- A JSON response, or
- A string message, depending on the flow configuration.
- Review the input data that triggers the flow (when available)
Using Flow as a Tool
The Add as Tool feature allows you to convert an existing flow into a reusable tool that can be accessed directly from Kernaro Chat or embedded within other Intelligent Flows.
Enabling a Flow as a Tool
A Flow can be added as a tool only if it does not include the Batch LLM, Excel Upload, or Excel Download nodes. If any of these three nodes are present in the flow, it cannot be added as a tool.
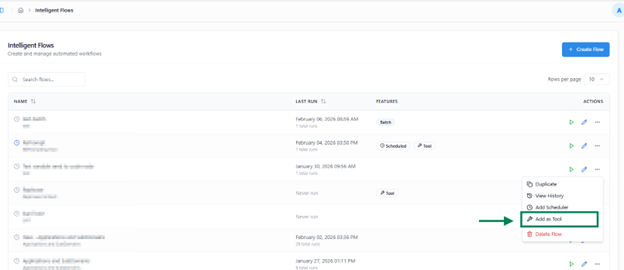
When selected:
- The flow is automatically registered as a tool within Kernaro Chat.
- It also becomes available for selection inside the Prompt Node of any other flow, enabling seamless reuse of its logic and functionality.
Edit Name and Description of the added Tool
Upon add & edit we can able update the Name & Description of the Flow Tool
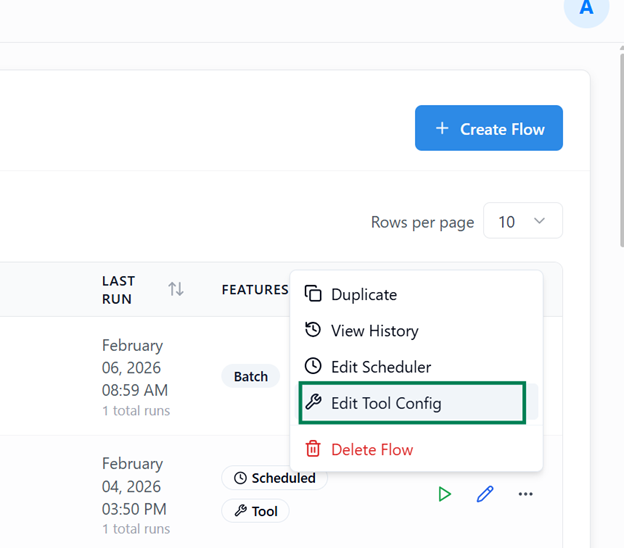
Upon clicking the Add as Tool or Edit Tool Config a window will appears where you can update Name & Description.
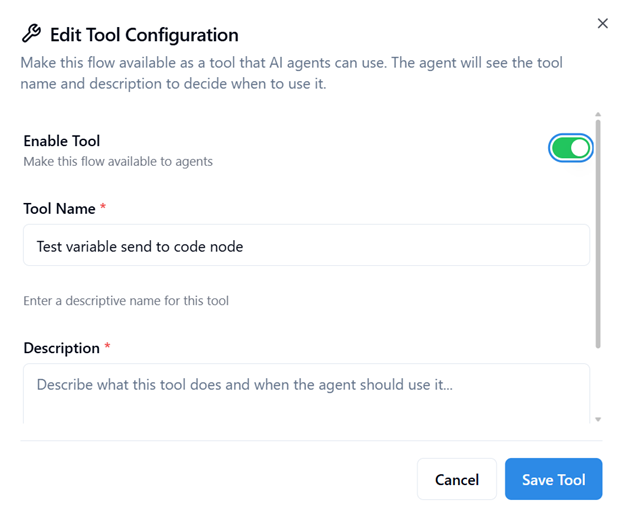
- Enable Tool:
Enable Tool makes this Flow available on Kernaro Chat
- Provide a Tool Name:
Assign a unique, descriptive name for identification in Kernaro Chat and other flows.
- Add a Description:
Include a clear explanation to help the agent understand the tool’s purpose and context.
Flow Scheduler
The Scheduler feature allows you to automate flow execution at predefined intervals, eliminating the need for manual triggering and ensuring consistent automation.
Accessing the Scheduler
- To configure scheduling for a flow:
- Open the More Options menu for the desired flow in Listing View.
- Select Add Scheduler to set up a schedule.
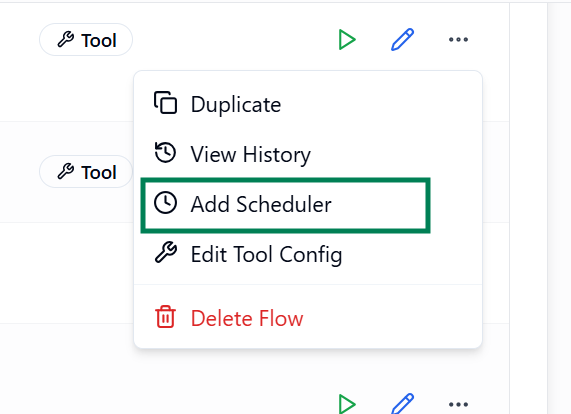
- Once a schedule is configured, you can disable or re-enable it anytime using the same menu option.
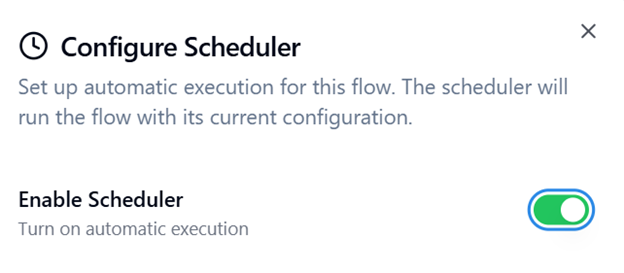
Note: Flows containing Input Nodes cannot be scheduled.
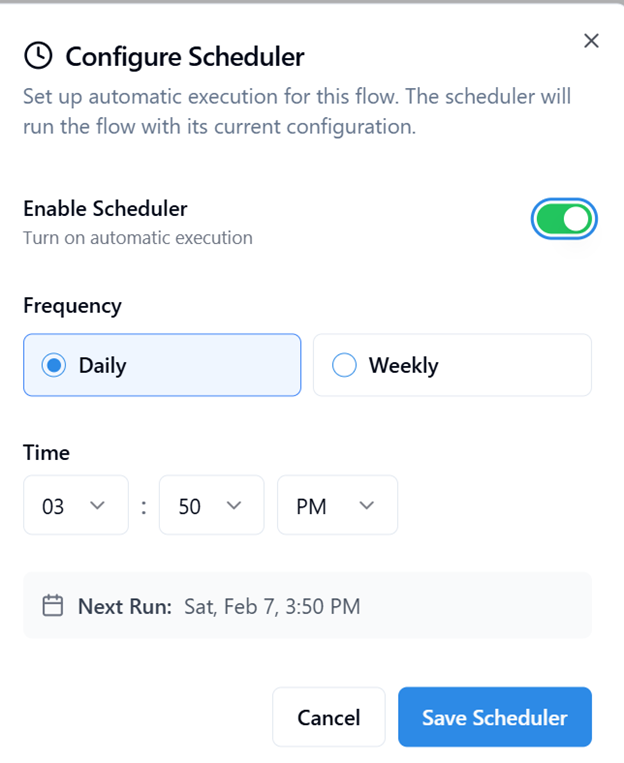
- When a flow is scheduled, a schedule icon appears before its name in the listing view, indicating that it will run automatically based on the defined schedule.
Scheduling Options
You can configure the scheduler to execute flows at either daily or weekly intervals:
- Daily Schedule – Specify the exact time of day when the flow should run automatically.
- Weekly Schedule – Choose both the day of the week and the execution time.
Execution Behavior
When the scheduled time is reached, the flow executes automatically according to its configured nodes and logic; no user action is required.
- Each scheduled execution is recorded in the Scheduled Run tab inside View History.
- You can open individual runs to review details such as execution status, output, and logs under view History.
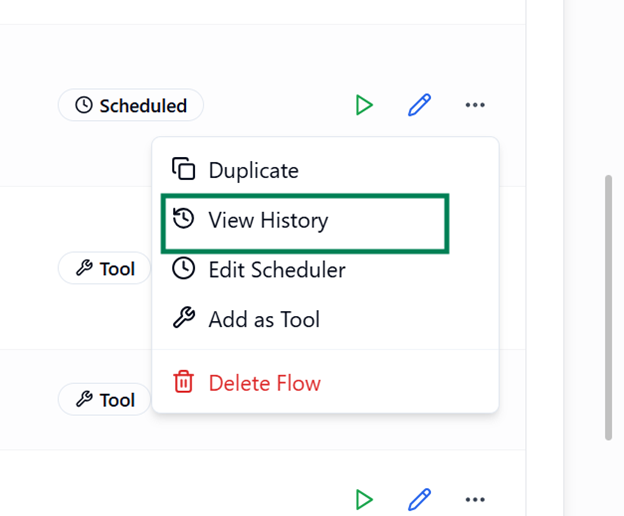
Copy Flow
The Copy Flow option allows you to quickly duplicate an existing flow along with all its configurations, making it easy to reuse or modify without altering the original.
How to Copy a Flow
- Open the More Options menu for the desired flow in Listing View.
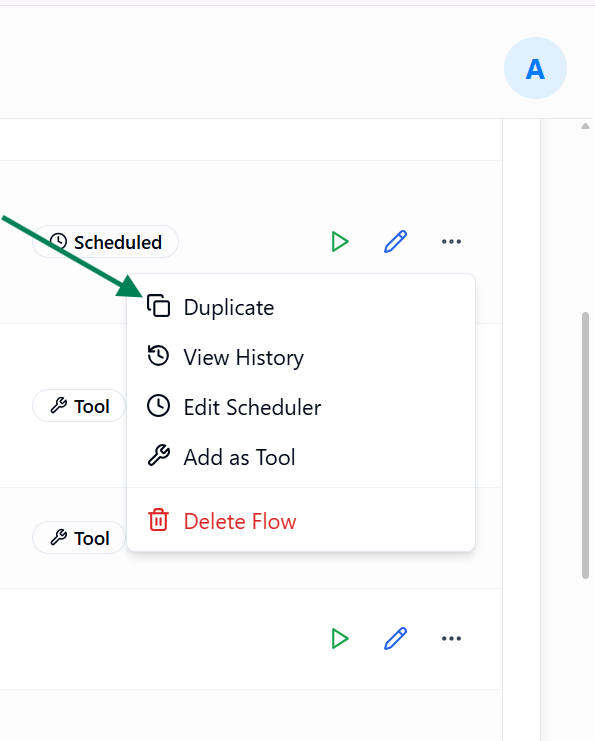
- Select Duplicate.
Behavior
- A new flow is created as an exact duplicate of the selected one.
- The copied flow includes:
- All nodes and their connections,
- Node configurations, parameters, and mappings,
- Any conditional logic or execution paths.
- However, only the flow structure and logic are duplicated. The following are not copied:
- Scheduler configurations
- Tool enablement status
- Execution history
- The newly copied flow will appear with its name appended by “(Copy)”, which can be renamed later as needed.
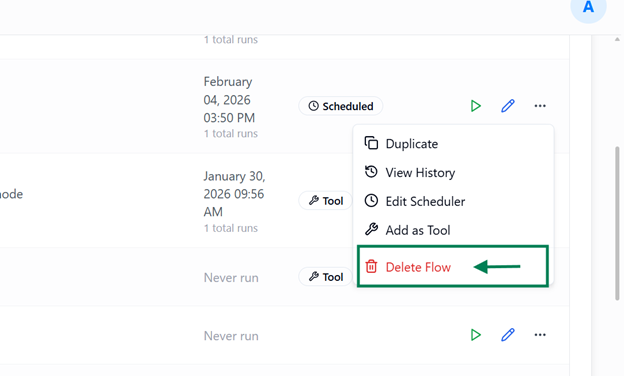
Delete Flow
The Delete Flow option allows you to permanently remove an existing flow and all its associated configurations from the system.
How to Delete a Flow
- Open the More Options menu for the desired flow in Listing View.
- Select Delete Flow.
- Confirm the deletion when prompted.
Behavior
- Deleting a flow permanently removes it from the system, including all associated configurations and references.
- If the flow was enabled as a tool, deleting it will also:
- Remove the corresponding entry from the Tool Configuration, and
- Clear any Scheduler Configuration linked to that flow.
- This ensures that no inactive or broken tool or scheduler references remain in the system.
Note: Deleting a flow does not affect any copies created using the Copy Flow option, those remain intact and fully functional.
Subscribe to our Newsletter
Get product updates, feature tips, and integration insights in your inbox.


