Batch LLM Configuration Guide
Batch LLM Overview
Batch LLM is designed to handle complex and large-scale processing scenarios within workflows by enabling asynchronous, batch-based inference. This approach is particularly useful when dealing with high-volume data or operations that require efficient, non-real-time execution.
For most LLM providers, the configuration remains consistent with the standard setup. However, when using AWS Bedrock, additional configuration is required to support batch processing via AWS infrastructure.
Specifically, AWS Bedrock requires:
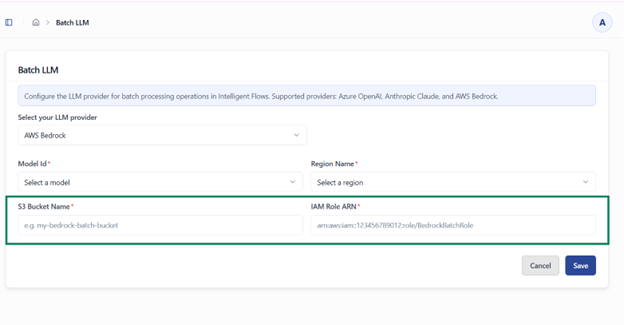
- S3 Bucket Name – Used to store batch input and output files during processing
- IAM Role ARN – Grants necessary permissions for Bedrock to access S3 and execute batch jobs securely
These additional parameters enable seamless integration with AWS services, ensuring secure data handling and scalable batch execution.
AWS Bedrock Configuration
To configure AWS Bedrock for use with Kernaro, please follow the steps below.
Prerequisites
Before you begin, ensure you have the following:
- An AWS account with permission to create S3 buckets, IAM roles, and manage Bedrock model access
- An AWS region that supports Bedrock batch inference for your chosen model, such as us-east-1 or us-west-2
- Your 12-digit AWS account ID, which can be found in the top-right corner of the AWS Console
Step 1: Create an S3 Bucket
Only one bucket is required.
- Open the AWS Console and go to S3
- Click Create bucket
- Enter a bucket name in the following format:
Recommend eg: kernaro-bedrock-batch-<your-org>
The bucket name must be globally unique, so choose a name that is recognizable and specific to your organization.
- Select the same AWS region in which Bedrock model access is enabled
- Under Block Public Access settings, leave all four checkboxes enabled
- Enable Bucket Versioning
- Under Default encryption, choose one of the following:
- SSE-S3 (AES-256), which is the recommended and simplest option
- SSE-KMS, only if required by your organization’s policy. If you use SSE-KMS, you must also add the optional KMS permissions described later in this guide
- Click Create bucket
- On the Add Tool page, click the Add Tool button located at the top right of the page.
- This opens the MCP tool configuration form.
Step 2: Create IAM Policy for Bedrock Service
- Navigate to IAM → Policies
- Click Create policy
- Select JSON editor
Replace with the following policy:
    {
  "Version": "2012-10-17",

  "Statement": [

    {

      "Sid": "Statement1",

      "Effect": "Allow",

      "Action": "bedrock:*",

      "Resource": "*"

    }

  ]

}
Click Next
Provide:
Policy Name: (e.g., Bedrock-XXXX-Policy)
Description: Optional
Click Create policy
Step 3: Create IAM Role for Bedrock Service
- Go to IAM → Roles → Create role
- Configure:
- Trusted Entity Type: AWS Service
- Use Case: Amazon Bedrock Agentcore
- Attach the policy created in Step 2
- Click Next
- Enter:
- Role Name: (e.g., Bedrock-XXXX-Role)
- Click Create role
Update Trust Policy
Open the created role
Go to Trust relationships → Edit trust policy
Replace with:
     {

  "Version": "2012-10-17",

  "Statement": [

    {

      "Sid": "AllowAccessToBedrock",

      "Effect": "Allow",

      "Principal": {

        "Service": "bedrock.amazonaws.com"

      },

      "Action": "sts:AssumeRole",

      "Condition": {

        "StringEquals": {

          "aws:SourceAccount": ""

        }

      }

    }

  ]

}
⚠️ Replace <YOUR_ACCOUNT_ID> with your AWS account ID.
Step 4: Create Bedrock Access Policy (PassRole)
Go to IAM → Policies → Create policy
Select JSON and use:
   {

  "Version": "2012-10-17",

  "Statement": [

    {

      "Effect": "Allow",

      "Action": "iam:PassRole",

      "Resource": "arn:aws:iam:::role/"

    }

  ]

}
⚠️ Replace:
- <ACCOUNT_ID>
- <BEDROCK_ROLE_NAME>
Name the policy and create it
Step 5: Create S3 Access Policy
Go to IAM → Policies → Create policy
Use the following JSON:
  {

  "Version": "2012-10-17",

  "Statement": [

    {

      "Effect": "Allow",

      "Action": [

        "s3:GetObject",

        "s3:PutObject",

        "s3:ListBucket"

      ],

      "Resource": [

        "arn:aws:s3:::",

        "arn:aws:s3:::/*"

      ]

    }

  ]

}
⚠️ Replace <BUCKET_NAME> with your actual bucket name.
Create the policy
Step 6: Create IAM Role for EC2 (Kernaro Server)
- Go to IAM → Roles → Create role
- Configure: Trusted Entity Type: AWS Service
- Use Case: EC2
- Click Next
- Attach required policies (Attach the below AWS managed policy to the role)
- AmazonBedrockFullAccess policy
- Bedrock Access Policy created in Step 4
- S3 Access Policy created in Step 5
- Enter: Role Name: (e.g., Kernaro AI-XXXX-Role)
- Click Create role
Step 7: Update S3 Bucket Policy
Go to the created S3 bucket In Step 1
Navigate to Permissions → Bucket Policy → Edit
Paste the following:
  {

  "Version": "2012-10-17",

  "Statement": [

    {

      "Effect": "Allow",

      "Principal": {

        "AWS": [

          "arn:aws:iam:::role/",

          "arn:aws:iam:::role/"

        ]

      },

      "Action": [

        "s3:GetObject",

        "s3:PutObject",

        "s3:ListBucket"

      ],

      "Resource": [

        "arn:aws:s3:::",

        "arn:aws:s3:::/*"

      ]

    }

  ]

}
⚠️ Replace:
- <ACCOUNT_ID>
- <BEDROCK_ROLE>
- <EC2_ROLE>
- <BUCKET_NAME>
Click Save changes
Summary
After completing these steps, you will have:
- An S3 bucket configured for Bedrock usage
- IAM policies enabling Bedrock and S3 access
- Roles for Bedrock and EC2 services
- Secure access configured via bucket policy
Configure Kernaro
In Kernaro’s LLM configuration screen for the AWS Bedrock provider, enter the following:
| Field | Value |
|---|---|
| AWS Region | The AWS region selected earlier, for example us-east-1 |
| S3 Bucket | The bucket name you have created in AWS |
| Batch Service Role ARN | Get the IAM role ARN from the Role created in Step 3 (e.g. “arn:aws:iam::<ACCOUNT_ID>:role/<BEDROCK_ROLE>”) |
After entering these values, save the configuration.
Verify the Setup in AWS console (Optional)
In the AWS Console
- Go to S3 and open your bucket
- A batch-input/ folder should appear containing a .jsonl file
- Go to Bedrock and open Batch inference
- The job should progress from Submitted to InProgress to Completed
- Return to S3
- A batch-output/ folder should now contain a file named similar to <job-id>.jsonl.out
- In Kernaro , The job should show as completed
- You should be able to open and review the results
Note: Batches with 100 or more entries will be processed via S3 storage. Smaller batches (under 100 entries) will be processed directly without S3.
Troubleshooting
| Issue | Cause | Resolution |
|---|---|---|
| AccessDeniedException when creating the batch job | Trust policy is missing or has incorrect SourceAccount or SourceArn values | Reopen the role, go to the Trust relationships tab, and update the trust policy using the JSON from Section 4.1 |
| Job fails immediately and CloudTrail shows S3 AccessDenied | Permissions policy has an incorrect bucket name, incorrect account ID, or is missing aws:ResourceAccount | Recreate or update the permissions policy from Section 4.2 |
| ValidationException: model not accessible or subscription-related error | Marketplace subscription is not active yet, or Anthropic FTU form has not been completed | Wait up to 15 minutes after first use. For Claude models, complete the Anthropic FTU process if required |
| KMS-related access denied error | Bucket uses SSE-KMS and the KMS permissions block was not added | Add the optional KMS block from Section 4.2 and ensure the KMS key policy allows access |
| ValidationException for too few records | Input JSONL file does not meet the minimum batch size for the model | Increase the number of records to meet the quota shown in Service Quotas |
| Bedrock cannot find the role | Role was created in a different account or the ARN was entered incorrectly | Copy the ARN again directly from IAM |
| Input upload succeeds but the job remains in Submitted | Bucket and Bedrock job are in different AWS regions | Ensure the bucket and Bedrock configuration use the same region |
Security Notes
- Use least privilege. The IAM role should be restricted to a single S3 bucket and your own AWS account only
- Do not change the S3 Resource to *
- Keep Block Public Access enabled on the bucket
- Do not reuse KernaroBedrockBatchRole for any other service or workload
- If your organization requires object-level audit logs, enable CloudTrail S3 data events for the bucket
- If you suspect the role has been exposed or misused, delete and recreate it. This generates a new ARN
Subscribe to our Newsletter
Get product updates, feature tips, and integration insights in your inbox.


